1. Day 1
Healing will take longer than anticipated; during its first few weeks, you may notice scabbing, itching, and flaky skin. These symptoms are entirely typical, and it’s wise not to scratch or pick at your tattoo as this could lead to infection and severe inflammation. Instead, pat dry the area with a soft towel or paper towels until its itchy feeling subsides.
2. Day 2
In the second week, you should notice significant improvements: redness and oozing will begin to diminish while itching should subside. As soon as the tattoo heals, scabs may start to form over it and will eventually fall off on their own, leaving behind new layers of skin.
3. Day 3
The redness should gradually fade, and a light scab may form over the tattoo. At this stage, it is critical to continue washing your tattoo at least twice daily. Your tattoo should still appear dull and dry; this is a sign that it is beginning to heal, with deep layers being repaired.
4. Day 4
Once your tattoo has been applied, you may notice its surrounding skin becoming slightly red and swollen as your body sends plasma fluid directly into the tattooed area to heal and close it off. This occurs because your body releases plasma fluid now onto it to repair and close off any wounds in that region. At this crucial stage of healing, patience must be exercised as any attempt at clearing away plasma can alter its original design. Instead, take your time and let the skin recover naturally.
5. Day 5
After receiving a tattoo, the initial day of aftercare is essential in facilitating its healing. Proper hygiene and diet help speed the recovery timeframe. At week three, any itching, flaking, and scabbing should have subsided, yet this remains an area of sensitivity and should not be touched or picked.
6. Day 6
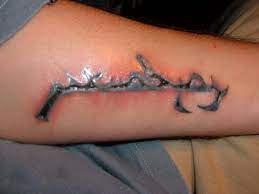
At first, your tattoo may resemble an open wound; its red and swollen appearance should begin to subside over time. As part of its natural healing process, your tattoo may continue to release plasma, blood, and ink; therefore, it must remain clean during this period.
7. Day 7
tattoos often release plasma, blood, and ink during their first few days of healing. Your body creates this fluid to close off skin gaps and keep it healthy, and it should be easily eliminated with gentle soap and water.
8. Day 8
As part of its healing process, your tattoo may appear dull and cloudy during this stage. At this stage, your tattoo may start exuding plasma – blood proteins that work against open wounds to promote healing – so keep it clean and do not rub! As part of its role in healing processes, keep away from direct sunlight for best results.
9. Day 9
Day 9 marks when your tattoo begins to heal, with its scabs peeling away and its itching lessening. At this stage, it is vital to keep it moisturized while avoiding anything that will rub against or cause break-off of scabs – the ideal method is using a quality moisturizer and soft cloth.
10. Day 10
Approximately two weeks into your tattoo healing process, your skin should appear reddened, swollen, cloudy, and exuding plasma, lymphatic fluid, and ink. At this stage, you must be diligent about applying moisturizer multiple times per day to minimize itching and scabbing – this will help your tattoo heal as quickly as possible.